SPF, DKIM & DMARC Guide: Modern Email Authentication Protection
The Complete Guide to Email Authentication: SPF, DKIM & DMARC Protection
Email spoofing is one of the most persistent threats facing organizations today. Attackers impersonate legitimate domains to distribute malware, steal credentials, and damage reputations. The solution? A trio of email authentication protocols that work together to verify sender identity: SPF, DKIM, and DMARC.
In this guide, we’ll explore how these protocols function, why each one matters, and how to implement them effectively to protect your organization and your customers.
Understanding the Email Spoofing Problem
Before diving into solutions, let’s understand the problem. Email was designed in an era when trust was assumed. The Simple Mail Transfer Protocol (SMTP) has no built-in mechanism to verify that the sender is who they claim to be. This makes it trivially easy for attackers to forge sender addresses.
When you receive an email appearing to be from your bank, CEO, or trusted vendor, there’s no guarantee it actually came from them—unless proper authentication is in place.
SPF: The First Line of Defense
What SPF Does
Sender Policy Framework (SPF) allows domain owners to specify which mail servers are authorized to send email on behalf of their domain. Think of it as a guest list for your domain’s email servers.
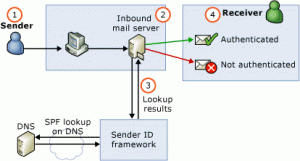
When a receiving mail server gets a message, it checks the SPF record published in DNS to verify whether the sending server’s IP address is on the approved list.
How SPF Works in Practice
SPF operates at the SMTP level, checking the “envelope from” address—not the visible “From” header that users see. Here’s what happens:
- An email arrives at a receiving mail server
- The server extracts the domain from the SMTP “MAIL FROM” command
- It queries DNS for an SPF record at that domain
- The record lists authorized sending IP addresses and mail servers
- If the sending server’s IP matches an authorized entry, SPF passes
Creating Your SPF Record
SPF records are DNS TXT records that begin with v=spf1. They use mechanisms to define authorized senders:
Common SPF mechanisms:
- ip4 and ip6: Authorize specific IP addresses or ranges
- mx: Authorize servers listed in your domain’s MX records
- a: Authorize servers listed in your domain’s A/AAAA records
- include: Reference another domain’s SPF record
Example SPF records:
For Microsoft 365:
v=spf1 include:spf.protection.outlook.com ~all
For Google Workspace:
v=spf1 include:_spf.google.com ~all
For multiple email services:
v=spf1 include:_spf.google.com include:servers.mcsv.net ip4:203.0.113.0/24 ~all
The Critical SPF Limitation
Here’s where SPF falls short: it only validates the SMTP envelope sender, not the “From” header that recipients see in their inbox. An attacker can set their own domain in the envelope (which passes SPF) while displaying your domain in the visible From header. This is called a “header from” mismatch.
This fundamental weakness is why SPF alone cannot stop spoofing.
SPF Best Practices
1. Mind the DNS Lookup Limit
SPF has a hard limit of 10 DNS lookups. Exceeding this makes your entire SPF record invalid. Each include, mx, a, redirect, and exists mechanism counts toward this limit.
Workaround: Use subdomains for different sending services. Each subdomain can have its own SPF record with its own 10-lookup limit.
2. Use the Right Qualifier
End your SPF record with ~all (softfail) rather than -all (fail) during initial deployment. This prevents legitimate email from being blocked while you refine your configuration.
3. Publish SPF for Non-Sending Domains
Even domains that never send email need SPF records to prevent abuse:
v=spf1 -all
This explicitly states that no servers are authorized to send as this domain.
DKIM: Cryptographic Email Verification
What Makes DKIM Different
While SPF checks IP addresses, DomainKeys Identified Mail (DKIM) uses cryptographic signatures to verify that an email hasn’t been tampered with and was authorized by the domain owner.
Critical advantage: DKIM survives email forwarding. When someone forwards an email through their mailbox rules, SPF breaks because the forwarding server isn’t in the original domain’s SPF record. DKIM signatures remain valid.
How DKIM Works
The process involves public key cryptography:
- Your mail server signs outgoing emails using a private key
- The signature covers specific email headers and the message body
- The signature is added to the email as a DKIM-Signature header
- Your public key is published in DNS
- Receiving servers retrieve the public key and verify the signature
Anatomy of a DKIM Signature:
DKIM-Signature: v=1; a=rsa-sha256; d=example.com; s=selector1; c=relaxed/relaxed; h=from:to:subject:date; bh=base64BodyHash; b=base64SignatureHash
Key components:
- v=1: DKIM version
- a=rsa-sha256: Signing algorithm (always use SHA-256)
- d=example.com: Signing domain
- s=selector1: Selector pointing to the public key
- h=from:to:subject:date: Headers included in the signature
- bh=: Hash of the message body
- b=: The actual signature
Publishing DKIM Keys
Public keys are published as DNS TXT records at:
selector._domainkey.yourdomain.com
Example DKIM DNS record:
selector1._domainkey.example.com TXT “v=DKIM1; k=rsa; p=MIGfMA0GCSq…”
Essential tags:
- v=DKIM1: Version (should always be present)
- k=rsa: Key type
- p=: Base64-encoded public key
DKIM Key Management
Key Length: Use 2048-bit RSA keys minimum. 1024-bit keys are no longer considered secure.
Key Rotation: Rotate DKIM keys regularly—ideally monthly. Here’s a safe rotation strategy:
- Generate two key pairs with different selectors (s1 and s2)
- Publish both public keys in DNS
- Start signing with selector s1
- After one month, switch to signing with s2
- Wait seven days (to account for DNS caching)
- Replace the key at s1 with a new key
- Next month, switch back to s1
- Wait seven days, then replace s2
This ping-pong approach ensures you never invalidate signatures on emails in transit.
Adding Context to Your Keys:
Use the n= tag to document which service uses each selector:
marketing._domainkey.example.com TXT “v=DKIM1; n=SendGrid; k=rsa; p=…”
The DKIM Weakness
Without additional controls, the domain specified in the DKIM signature (d= tag) doesn’t have to match the domain in the “From” header that users see. An attacker can place a valid DKIM signature with their own domain while spoofing yours in the visible From address.
This is where DMARC becomes essential.
DMARC: The Missing Link
What DMARC Accomplishes
Domain-based Message Authentication, Reporting, and Conformance (DMARC) is the protocol that ties everything together. It does three critical things:
- Enforces alignment between SPF/DKIM and the visible From header
- Tells receivers what to do with emails that fail authentication
- Provides visibility through detailed reports about email authentication
DMARC requires that either SPF or DKIM passes and aligns with the From header domain. This means:
For SPF alignment: The domain in the SMTP envelope must match (or share the organizational domain with) the From header domain.
For DKIM alignment: The domain in the DKIM signature must match (or share the organizational domain with) the From header domain.
Understanding Alignment
Alignment can be “relaxed” (default) or “strict”:
Relaxed alignment: Organizational domains must match
- From: [email protected]
- DKIM d=example.com → PASSES
Strict alignment: Domains must match exactly
- From: [email protected]
- DKIM d=example.com → FAILS
- DKIM d=mail.example.com → PASSES
Relaxed alignment is recommended for most organizations as it’s more forgiving of legitimate subdomain configurations.
DMARC Policies
DMARC policies tell receiving mail servers what to do with emails that fail authentication:
- none
- Monitor only. Email is delivered regardless of authentication result. Use this initially to collect data without affecting email delivery.
- quarantine
- Failed emails should be treated as suspicious—typically sent to spam folders or subjected to additional filtering.
- reject
- Failed emails should be rejected outright during the SMTP transaction.
Creating Your DMARC Record
DMARC records are published as DNS TXT records at _dmarc.yourdomain.com.
Starter DMARC record (monitoring mode):
_dmarc.example.com TXT “v=DMARC1; p=none; rua=mailto:[email protected]”
Enforced DMARC record:
_dmarc.example.com TXT “v=DMARC1; p=reject; rua=mailto:[email protected]; ruf=mailto:[email protected]; pct=100”
Essential DMARC tags:
- v=DMARC1: Version identifier (required)
- p=: Policy for the domain (required)
- rua=: Email address for aggregate reports
- ruf=: Email address for forensic/failure reports
- pct=: Percentage of messages to apply policy to (default 100)
- sp=: Policy for subdomains (defaults to main policy)
DMARC Reports: Your Intelligence Feed
DMARC provides two types of reports that are invaluable for security and operations:
Aggregate Reports (RUA):
- Sent daily by major email receivers
- XML format with statistics on authentication results
- Show which IP addresses send as your domain
- Indicate SPF/DKIM pass/fail rates
- Help identify legitimate senders and spoofing attempts
Forensic Reports (RUF):
- Individual failure reports with email samples
- Sent in real-time when authentication fails
- Useful for troubleshooting specific issues
- Less commonly sent due to privacy concerns
The Complete Implementation Strategy
Phase 1: Audit and Prepare (Week 1)
Inventory all email sources:
- Corporate email (Microsoft 365, Google Workspace, etc.)
- Marketing platforms (Mailchimp, SendGrid, HubSpot, etc.)
- Transactional email services
- HR systems, CRMs, helpdesk software
- Any application that sends email as your domain
Document your subdomains:
- Identify all subdomains that send email
- Note which don’t send email but should be protected
Phase 2: Deploy SPF (Week 2)
For each sending domain/subdomain:
- Create an SPF record listing all authorized mail servers
- Start with ?all (neutral) if unsure, or ~all (softfail) if confident
- Test the record with SPF validation tools
- Monitor for any delivery issues
Quick deployment for common scenarios:
Microsoft 365 only:
v=spf1 include:spf.protection.outlook.com ~all
Google Workspace only:
v=spf1 include:_spf.google.com ~all
Multiple services:
v=spf1 include:spf.protection.outlook.com include:servers.mcsv.net ~all
Non-sending domain protection:
v=spf1 -all
Phase 3: Deploy DKIM (Week 3-4)
For each email service:
- Generate DKIM key pairs (or request them from your provider)
- Publish public keys in DNS
- Configure services to sign outgoing email
- Verify signatures are being added to messages
- Test with authentication-checking tools
Service-specific steps vary:
- Cloud providers (Microsoft 365, Google Workspace) have built-in DKIM configuration interfaces
- Marketing platforms provide DKIM keys and DNS records to publish
- Self-hosted mail servers require manual key generation and signing configuration
Phase 4: Deploy DMARC in Monitor Mode (Week 5-8)
Initial DMARC record:
_dmarc.example.com TXT “v=DMARC1; p=none; rua=mailto:[email protected]; ruf=mailto:[email protected]”
Set up report collection:
- Create a dedicated mailbox for DMARC reports
- Consider using a DMARC analysis tool for easier parsing
- Many reports will arrive as compressed XML files
Monitor and analyze reports for 4-8 weeks:
- Identify all legitimate sending sources
- Verify SPF and DKIM authentication status
- Investigate any unexpected senders
- Fix any authentication failures from legitimate sources
Phase 5: Gradual Policy Enforcement (Month 3+)
Move to quarantine:
_dmarc.example.com TXT “v=DMARC1; p=quarantine; rua=mailto:[email protected]”
- Continue monitoring reports for 2-4 weeks
- Ensure no legitimate mail is being quarantined
- Fix any issues that surface
Move to reject:
_dmarc.example.com TXT “v=DMARC1; p=reject; rua=mailto:[email protected]”
- This is the ultimate protection level
- Failed emails are rejected during SMTP, never delivered
- Only implement after thorough testing in quarantine mode
Phase 6: Protect Subdomains
For each subdomain:
- Subdomains inherit the parent domain’s DMARC policy by default
- Create specific policies for subdomains if needed
- Protect non-sending subdomains with v=spf1 -all and can optionally set DMARC to p=reject
Common Implementation Challenges
Challenge: Third-Party Senders
Problem: Marketing tools, CRM systems, and other services send as your domain but you don’t control their infrastructure.
Solution:
- Prefer services that support DKIM signing with your domain
- Add their SPF includes if necessary (watch the 10-lookup limit)
- For stubborn services, consider using a subdomain (e.g., marketing.example.com)
Challenge: Email Forwarding
Problem: SPF breaks when email is forwarded through mailbox rules because the forwarding server isn’t in your SPF record.
Solution:
- DKIM signatures survive forwarding—this is why DKIM alignment is crucial
- Ensure all legitimate email is DKIM-signed
- This is why DMARC requires only one of SPF or DKIM to pass
Challenge: Mailing Lists
Problem: Traditional mailing lists modify messages (adding footers, changing subjects), which breaks DKIM signatures.
Solution for list operators:
- Use RFC 2369 List-Unsubscribe headers instead of footer links
- Don’t modify subjects; use List-Id headers instead
- Don’t alter message content
- If modification is necessary, rewrite the From address to the list address
Solution for list users:
- If your domain has enforced DMARC, inform list operators
- Well-configured lists will handle this properly
- Poorly configured lists may need to rewrite the From address
Challenge: Calendar Forwarding in Outlook
Problem: Outlook forwards calendar invites “on behalf of” the organizer, using their domain in the From header, which fails DMARC if your domain has an enforced policy.
Workaround:
- Forward calendar events as attachments instead
- Use “More > Forward as Attachment” instead of the standard Forward button
Challenge: SPF Record Size and Lookup Limits
Problem: Too many includes exceed the 10-lookup limit or the 512-byte DNS record size.
Solutions:
- Use subdomains for different email streams
- Rely on DKIM for vendors who support it, removing them from SPF
- Use IP addresses instead of includes where possible (though less flexible)
- Consider SPF flattening (replacing includes with IPs), though this requires maintenance
Advanced Topics
Percentage Rollout
The pct= tag allows gradual policy enforcement:
v=DMARC1; p=reject; pct=25; rua=mailto:[email protected]
This applies the reject policy to 25% of failed messages. However, it’s generally better to use p=none initially rather than partial enforcement, as it ensures consistent treatment.
Subdomain Policy
The sp= tag sets a different policy for all subdomains:
v=DMARC1; p=reject; sp=quarantine; rua=mailto:[email protected]
Warning: Using sp= can be risky as it applies to all current and future subdomains. It’s better to create specific DMARC records for subdomains that need different policies.
Forensic Report Options
The fo= tag controls when forensic reports are sent:
- fo=0 (default): Reports only when both SPF and DKIM fail
- fo=1: Reports if either SPF or DKIM fails
- fo=d: Reports when DKIM fails
- fo=s: Reports when SPF fails
Setting fo=1 can be useful for troubleshooting but generates many reports.
Alignment Modes
You can specify strict alignment requirements:
- adkim=s: Strict DKIM alignment (exact domain match)
- aspf=s: Strict SPF alignment (exact domain match)
Most organizations should use relaxed alignment (the default) unless they have specific security requirements.
Monitoring and Maintenance
Regular Tasks
Weekly:
- Review DMARC aggregate reports for anomalies
- Check for new unauthorized sending sources
- Monitor authentication failure rates
Monthly:
- Audit email services for configuration changes
- Review forensic reports (if receiving them)
- Rotate DKIM keys (recommended)
Quarterly:
- Review and update SPF records as services change
- Audit subdomains for proper authentication
- Test authentication with external tools
Key Metrics to Track
- DMARC compliance rate: Percentage of email passing DMARC
- Authentication methods: Ratio of SPF vs DKIM passes
- Source diversity: Number of distinct sending IPs/services
- Failure rate trends: Increasing failures may indicate attacks or misconfigurations
- Policy application: Percentage of receivers honoring your DMARC policy
Tools for Validation
DNS Record Validators:
- MXToolbox
- Google Admin Toolbox
- DMARC checking tools from OnDMARC, Dmarcian
Email Testing:
- Send test messages to Gmail accounts (shows authentication status clearly)
- Use mail-tester.com for comprehensive analysis
- Check Authentication-Results headers in received emails
DMARC Report Analyzers:
- Dmarcian
- OnDMARC
- Parsedmarc (open-source, self-hosted)
- Valimail
Security Benefits Beyond Anti-Spoofing
Implementing SPF, DKIM, and DMARC provides several security advantages:
Brand Protection
Enforced DMARC prevents attackers from sending convincing phishing emails that appear to come from your domain, protecting your customers and your reputation.
Visibility
DMARC reports show you every source attempting to send email as your domain—both legitimate and malicious. This intelligence is valuable for security operations.
Deliverability
Major email providers (Gmail, Yahoo, Microsoft) require proper email authentication. DMARC enforcement actually improves legitimate email delivery rates.
Compliance
Many regulations and standards (like PCI DSS) require email security controls. Email authentication demonstrates due diligence.
Incident Response
DMARC forensic reports can provide evidence during security incidents, showing exactly what attackers sent and when.
Real-World Impact
Organizations that implement DMARC see significant results:
- 70-90% reduction in email-based phishing attacks using their domain
- Improved email deliverability rates, especially to Gmail and Outlook
- Enhanced brand trust as customers see fewer spoofed messages
- Better visibility into legitimate email infrastructure
Major organizations across finance, healthcare, government, and technology have deployed DMARC at enforcement. The FBI, IRS, major banks, and Fortune 500 companies all use DMARC to protect their domains.
Getting Started Today
The journey to full DMARC enforcement takes time, but you can start immediately:
- Today: Inventory your email sending sources
- This week: Deploy SPF records in monitor mode
- Next week: Begin DKIM configuration with your email providers
- This month: Publish your first DMARC record with p=none
- Months 2-3: Analyze reports and fix authentication issues
- Month 4+: Move to p=quarantine, then p=reject
Email authentication isn’t optional anymore—it’s essential for protecting your organization, your customers, and your brand. SPF provides basic authorization, DKIM adds cryptographic verification, and DMARC ties them together with alignment requirements and enforcement policies.
The combination of these three protocols transforms email from an inherently vulnerable system into one where sender identity can be verified and spoofing can be prevented. Start your implementation today, and join the growing community of organizations taking email security seriously.
Quick Reference
SPF Record Examples
Non-sending domain:
v=spf1 -all
Microsoft 365:
v=spf1 include:spf.protection.outlook.com ~all
Google Workspace:
v=spf1 include:_spf.google.com ~all
DKIM Record Template
selector._domainkey.yourdomain.com TXT “v=DKIM1; k=rsa; p=YourBase64PublicKey”
DMARC Record Examples
Initial monitoring:
_dmarc.yourdomain.com TXT “v=DMARC1; p=none; rua=mailto:[email protected]”
Full enforcement:
_dmarc.yourdomain.com TXT “v=DMARC1; p=reject; rua=mailto:[email protected]; ruf=mailto:[email protected]”
Key Takeaways
- SPF authorizes mail servers by IP address (SMTP level)
- DKIM provides cryptographic signatures (survives forwarding)
- DMARC requires alignment with the visible From header (protects recipients)
- Deploy in stages: SPF → DKIM → DMARC monitor → DMARC enforce
- Monitor reports extensively before enforcement
- All three protocols work together—each one alone is insufficient
Additional Resources
- RFC 7208 (SPF)
- RFC 6376 (DKIM)
- RFC 7489 (DMARC)
- DMARC.org: Official DMARC information and best practices
- M3AAWG: Anti-abuse best practices and guides


