Are you a law firm using Microsoft 365? Have you encrypted your confidential emails using Office 365 Message Encryption (OME)
Author: Sandeep Saxena
If you use emails to exchange sensitive information and think that the sensitive information may leak into the wrong hands and can hurt your organization- you might be looking to implement email encryption. Especially if you are a law firm, financial institution, deals in sensitive patient information or if you are a political entity, all aspects of email security are of prime importance for you. Today two of the major email products, one from Google (product is called Google Workspace, earlier Gsuite) and another from Microsoft (product is called Microsoft 365, earlier Office 365) provide their own email encryption mechanisms.In this article I will cover how you can encrypt your emails using Office 365 Message Encryption (OME). Office 365 Message Encryption is an online service that’s built on Microsoft Azure Rights Management (Azure RMS) which is part of Azure Information Protection. This service includes encryption, identity, and authorization policies to help secure your email. You can encrypt messages by using rights management templates, the Do Not Forward option, and the encrypt-only option.
The new Office 365 Message Encryption (OME) capabilities allow organizations to share protected email with anyone on any device. Users can exchange protected messages with other Microsoft 365 organizations, as well as non-customers using Outlook.com, Gmail, Yahoo and other email services.
As an administrator, you can define mail flow rules to apply this protection. For example, you can create a rule that requires the encryption of all messages addressed to a specific recipient, or if the email contains specific words in the subject line, and also specify that recipients can’t copy or print the contents of the message.
What subscriptions do you need to use the new Office 365 Message Encryption (OME) capabilities?
To use the new Office 365 Message Encryption (OME) capabilities, you need one of the following plans:
- Office 365 Message Encryption is offered as part of Office 365 Enterprise E3 and E5, Microsoft Enterprise E3 and E5, Microsoft 365 Business Premium, Office 365 A1, A3, and A5, and Office 365 Government G3 and G5. Customers do not need additional licenses to receive the new protection capabilities powered by Azure Information Protection.
- You can also add Azure Information Protection Plan 1 to the following plans to receive the new Office 365 Message Encryption capabilities: Exchange Online Plan 1, Exchange Online Plan 2, Office 365 F1, Microsoft 365 Business Basic, Microsoft 365 Business Standard, or Office 365 Enterprise E1.
- Each user benefiting from Office 365 Message Encryption needs to be licensed to be covered by the feature.
- For the full list see the Exchange Online service descriptions for Office 365 Message Encryption.
Once you have the required subscription for OME, the only requirement for using the OME is that Azure Rights Management must be activated in your organization’s tenant. If it is, Microsoft 365 activates the new OME capabilities automatically and you don’t need to do anything.
Azure RMS is also activated automatically for most eligible plans, so you probably don’t have to do anything in this regard either.
But some Microsoft 365 customers may find that Azure RMS is not activated for them by default.
To check if Azure RMS is activated for you or not please go to Rights Management (windowsazure.com) or If you prefer to navigate to the rights management page from the admin center: Settings > Org settings > Services tab > Microsoft Azure Information Protection > Manage Microsoft Azure Information Protection settings
Make sure that Rights Management is activated (if not, please activate it)

But if on this page if you encounter the below shown screen that means that Azure RMS is not enabled for you and you need to enable it using PowerShell.

Steps to enable RMS using PowerShell
1. Open a Windows PowerShell console window as an administrator

2. Set-ExecutionPolicy RemoteSigned

3. Install-Module -Name AzureAD

4. Connect-AzureAD: This command will pop up a new window where you need to login with your Microsoft 365 admin.


5. Install-Module -Name Exchange Online Management -Required Version 2.0.3
6. Import-Module Exchange Online Management
7. Connect-Exchange Online -Show Progress $true
This command will pop up a window where you need to login with the same admin account you used earlier.

8. Get-IRM Configuration

9. Install-Module -Name AIPService

10. Update-Module -Name AIPService
11. Connect-AIPService

12. Get-AipService (this should show the service is not enabled)
13. Enable-AipService
14. Get-AipService (this should confirm the service was enabled successfully)

You may also be able to activate the Azure RMS from the Azure portal. Please see the instructions on this link:
How to activate the Rights Management protection service from the Azure portal
Once RMS is enabled and activated you need to define the mail flow rules.
Now let’s configure mail flow rules to set up OME
Let’s setup a mail flow rule to encrypt all outgoing messages when email subject or body contains the word “encrypt-this-email”
- Go to https://admin.exchange.microsoft.com/#/ -> Mail flow -> Rules

2. Click the + sign to add a new rule

3. Let’s name the rule “Encrypt with keyword”
4. Apply this rule if

5. Let’s specify our keyword

6. Do the following “Apply Office 365 Message Encryption and rights protection to the message with…” and select “Encrypt” RMS template

7. Leave other options to default and save.

8. Our rule is in place now.

9. Now let’s see what happens when we send email to different email providers. Let’s first send to gmail.com.
(remember our subject or body need to have the keyword: encrypt-this-email as we defined our rule for that.

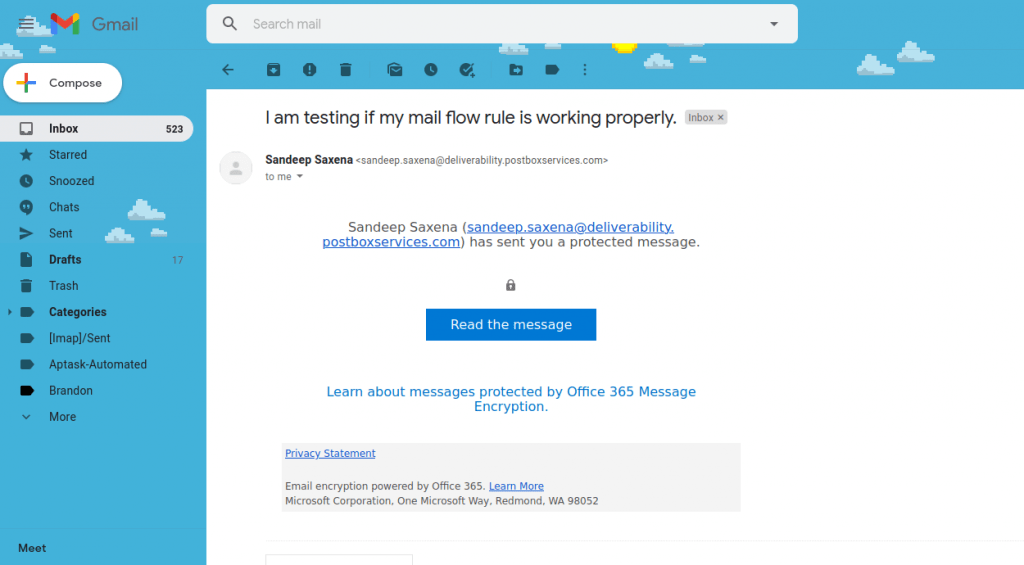
10. I receive an encrypted email on gmail.com

11. To read the encrypted message I click on “Read the message” and get this screen

12. Now I need to sign in using my Google account where I received the email and I see my email content

13. If you send a encrypted email to someone using Yahoo, they can login using yahoo id

To manage whether or not to allow recipients to use these social IDs like Google or Yahoo to sign in to the OME portal you can use these commands.
- Run the Set-OMEConfiguration cmdlet with the SocialIdSignIn parameter as follows:
Set-OMEConfiguration -Identity “OME Configuration” -SocialIdSignIn $false - To enable social IDs:
Set-OMEConfiguration -Identity “OME Configuration” -SocialIdSignIn $true
14. Now let’s see what happens when I send an encrypted email to someone who is not using Yahoo, Gmail or Outlook but a custom email server. They only see an option to read the message with a one-time passcode.

Now Microsoft 365 sends a one time 15 minutes expiring pass Flow code to the email address using which email can be read.

To manage whether or not one-time passcodes are generated for Office Message Encryption, run the Set-OMEConfiguration cmdlet with the OTPEnabled parameter as follows:
For example, to disable one-time passcodes:
Set-OME Configuration -Identity “OME Configuration” -OTP Enabled $true
To enable one-time passcodes:
Set-OME Configuration -Identity “OME Configuration” -OTP Enabled $true
Tip: Managing the display of the Encrypt button in Outlook on the web
By default, the Encrypt button in Outlook on the web is not enabled when you set up OME. As an administrator, you can manage whether or not to display this button to end-users. To manage whether or not the Protect button appears in Outlook on the web:
- Run the Set-IRMConfiguration cmdlet with the -SimplifiedClientAccessEnabled parameter as follows:
- For example, to disable the Encrypt button:
Set-IRMConfiguration -SimplifiedClientAccessEnabled $false - To enable the Encrypt button:
Set-IRMConfiguration -SimplifiedClientAccessEnabled $true
More Mail Flow Rules
I have shown how an encryption rule works by using a keyword. But there are many other scenarios which can be implemented as per your requirements. For example you can put a rule to encrypt each message marked important, or every message sent to a particular recipient. This page lists all possible scenarios for which you can put together mail flow rules.
Mail flow rule conditions and exceptions (predicates) in Exchange Online
References:
- How do I open a protected message? https://support.microsoft.com/en-gb/office/how-do-i-open-a-protected-message-1157a286-8ecc-4b1e-ac43-2a608fbf3098?ui=en-us&rs=en-gb&ad=gb
- Sending confidential emails with Gmail has become a whole lot easier : https://postboxservices.com/blogs/post/sending-confidential-emails-with-gmail-has-become-a-whole-lot-easier