How to Set Up a Catch-All Email Address in Microsoft 365
Learn how to create a catch-all in Microsoft365 using mail flow rules, configure MX records, and change domain status to Internal Relay. Ensure no important emails are lost with this step-by-step guide.
If you’re eager to learn and curious about the technical nitty-gritty, keep reading. But if you’d rather have someone implement everything for you, just reach out or purchase our hourly consultation.
What is a catch-all email address or a catch-all domain?
A catch-all email address is a mailbox that receives all emails sent to incorrect or non-existent addresses within a domain. This ensures that no important emails are lost due to typos or missing recipients.
Why Use a Catch-All Email Address?
Having a catch-all email address can be beneficial for:
- Preventing Lost Emails – Captures messages sent to incorrect addresses.
- Customer Support – Ensures you don’t miss inquiries due to address errors.
- Spam Monitoring – Helps detect potential phishing or unsolicited emails.
How does Catch-All email help with Spam Monitoring
Spammers often send emails to random addresses within a domain (e.g., [email protected], [email protected]), hoping that some exist. A catch-all mailbox collects these emails, allowing you to analyze the sender patterns and the sources of spam.
Note: If you need to set catch-all in Google Workspace refer to this article.
Step 1: Adding a New Domain to Microsoft 365
Before setting up a catch-all address, you need to ensure your domain is added and verified in Microsoft 365. If your domain is not yet connected, follow these steps:
1. Go to the Microsoft 365 Admin Center
- Sign in at https://admin.microsoft.com.
- Navigate to Settings > Domains.
2. Add Your Domain
- Click Add Domain and enter your domain name (e.g.,
yourdomain.com). - Click Next and select how you want to verify ownership.
3. Verify Your Domain
Microsoft will provide a TXT record that you need to add to your domain’s DNS settings. Here’s how:
- Log in to your domain registrar (e.g., GoDaddy, Namecheap, Cloudflare).
- Go to your DNS settings.
- Add a TXT record with the value provided by Microsoft.
- Save the changes and return to the Microsoft 365 Admin Center.
- Click Verify once the record has propagated (this can take a few minutes to 24 hours).
Step 2: Configuring MX Records for Your Domain
To ensure your emails work properly, you need to set up MX (Mail Exchange) records that direct emails to Microsoft 365.
After you verify the domain in step 1, you will get other DNS records to set MX, SPF and optional DKIM to get the domain working with Microsoft 365.
You can also follow the following steps to set the correct MX record.
1. Find Your MX Records in Microsoft 365
- Go to Microsoft 365 Admin Center > Domains.
- Select your domain and go to the DNS settings.
- You will see the required MX record (e.g.,
yourdomain-com.mail.protection.outlook.com).
2. Add the MX Records to Your DNS
- Log in to your domain registrar.
- Go to the DNS settings and find the MX Records section.
- Add a new MX record with the following details:
- Host:
@(or leave blank) - Value:
yourdomain-com.mail.protection.outlook.com - Priority:
0(or the lowest number available)
- Host:
3. Save and Verify
- Save the changes and wait for propagation (this may take a few hours).
- Return to Microsoft 365 and confirm your DNS settings are correct.
Step 3: Create a Mailbox (Dedicated or Shared)
Since Office 365 does not offer a built-in option, you can implement a catch-all mailbox using a shared mailbox and a mail flow rule. Follow these steps:
Create a Dedicated Catch-All Mailbox
- In the Microsoft 365 Admin Center, go to Users > Active Users.
- Click Add a User and create an email (e.g.,
[email protected]). - Assign a Microsoft 365 Exchange Online Plan (required for email functionality).
Or Create a Shared Mailbox
- Log in to the Microsoft 365 Admin Center (admin.microsoft.com)
- Navigate to Groups > Shared mailboxes.
- Click + Add a shared mailbox.
- Enter a name and email address (e.g., [email protected]).
- Click Create and then Edit Members to add users who will access the mailbox.
📌 Note: Shared mailboxes do not require a paid license unless users need direct sign-in access.
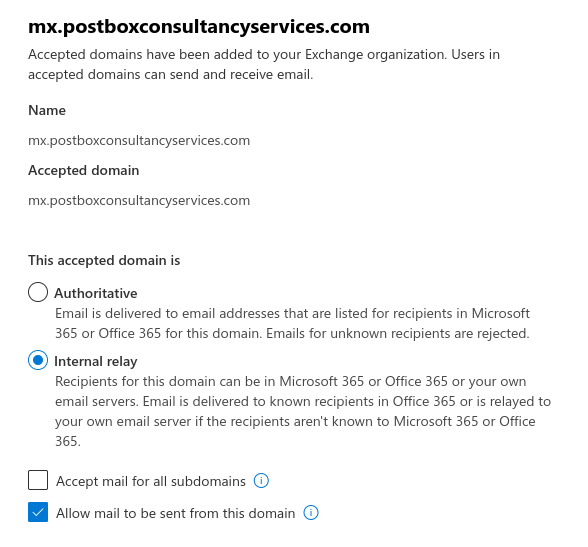
Step 4: Changing the Domain Status
Why Change Domain Status?
By default, Microsoft 365 treats your domain as Authoritative, meaning it will reject any email sent to an invalid address. Changing it to Internal Relay allows you to forward unrecognized emails to another mail system or user.
How to Change Domain Status in Microsoft 365
- Go to Microsoft Exchange Admin Center at https://admin.exchange.microsoft.com.
- Click Mail Flow > Accepted Domains.
- Select your domain (e.g.,
yourdomain.com). - Change the status from Authoritative to Internal Relay.
- Click Save.
🔹 This change helps redirect emails to another mail system or fallback mailbox (that we created in step 3) instead of bouncing them.
Step 5: Set Up a Mail Flow Rule to Forward Emails
Now, create a mail flow rule to direct all misaddressed emails to your shared mailbox.
- In the Microsoft 365 Admin Center, go to Exchange Admin Center (exchange.microsoft.com).
- Navigate to Mail flow > Rules and click + Add a rule.
- Select Create a new rule and provide a name (e.g., “Catch-All Rule”).
- Under Apply this rule if…, choose The sender is… and select “is external/internal” and “Outside the organization“
- Under Do the following, select Redirect the message to and choose the dedicated or shared mailbox (
[email protected]) that we created in step 3. - Click Save to activate the rule.
🔹 Make sure the rule’s status is Enabled.
Step 6: Test Your Catch-All Setup
To ensure it’s working correctly:
- Send a test email to a non-existent address within your domain.
- Check if the email lands in your catch-all shared mailbox.
- If not, review the mail flow rule settings and adjust as needed.
Final Thoughts
While Microsoft 365 doesn’t natively support catch-all email addresses, you can use a mailbox and mail flow rules to capture misrouted emails. This ensures no important messages are lost due to incorrect addresses.
Need help setting up or optimizing your email infrastructure? Contact us today for expert guidance!
If you need to set Catch-All in Google Workspace refer to the following article: