GNU Mailman: An open source mailing list management tool
Author: Chandan Pawar
Very often corporates, organizations and educational institutes need email tools to make announcements and to create online group discussions. GNU Mailman is an open source software for managing such mailing lists.
Announcement lists allow you to send announcements to an assigned group whereas discussion lists allow a group to discuss topics amongst themselves. Mailman is used by many well known universities to manage mailing lists of students.
Mailman is primarily written in Python and belongs to the GNU project. Mailman runs on most Unix-like systems, including Linux. Since Mailman 3.0 it has required python-3.4 or newer. It works with Unix-style mail servers such as Exim, Postfix, Sendmail and qmail.
Features include:
- A customizable publicly-accessible web page for each mail list.
- Web application for list administration, archiving of messages, spam filtering, etc. Separate interfaces are available for users (for self-administration), moderators (to accept/reject list posts), and administrators.
- Support for multiple administrators and moderators for each list.
- Per-list privacy features, such as closed-subscriptions, private archives, private membership rosters, and sender-based posting rules.
- Integrated bounce detection and automatic handling of bouncing addresses.
- Integrated spam filters
- Majordomo-style email based commands.
- Support for virtual domains.
Features credit: https://en.wikipedia.org/wiki/GNU_Mailman
This blog is intended for individuals who have the responsibility to manage mailing lists using Mailman.
Installation and configuration
Installation and configuration of Mailman open source software in Ubuntu 18.04 Operating System.
Requirements :
- Operating system : Ubuntu 18.04
- Domain’s DNS access
Software Requirements :
- Apache2
- Postfix Email Server
We will install the Mailman on the subdomain : mailmain.postbox.services
Note : Please change IP and domain to your IP and domain during configuration.
Setup the A record pointing to the IP address of the VPS which you are using for Mailman installation. Also set the MX record of the domain to the same domain. So in our case MX record of mailman.postbox.services will point to mailman.postbox.services.
Step 1 :
SSH to VPS and set hostname :
# systemctl set-hostname mailmain.postbox.services
Step 2:
Now we are going to install Apache2 for the Mailman web page and dashboard.
# apt-get install apache2
After apache2 is successfully installed, start the apache2 service.
Step 3: Now let’s install Mailman from command line
# apt-get install mailman
Press OK
Choose the language and press OK
EXIT to keep the default options of installing Postfix.
Check the hostname and Press OK.
Mailman is successfully installed now.
Start the Mailman Service:
# service mailman start
# service mailman status
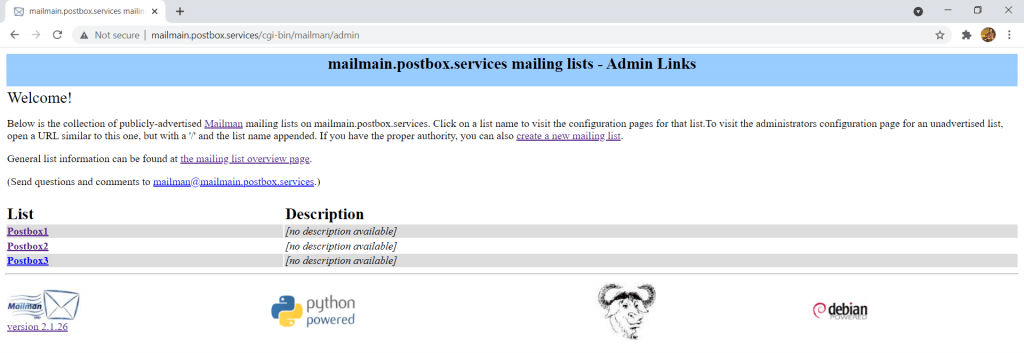
Mailman is now successfully installed and running. You can login via URL : http://mailmain.postbox.services/cgi-bin/mailman/admin (prepare your URL using the domain you have used)
Some commands which you can use from backend are:
- newlist: add a new list
- rmlist ”list”: delete a list
- list_lists: list all the lists
- list_members ”list”: list all the members of the list
- add_members ”[email protected]” ”list”: add e-mail [email protected] to the list list.
- remove_members ”[email protected]” ”list”: remove e-mail [email protected] to the list list
- mmsitepass: define a site password to access administration web interfaces
Mailing list creation:
If you need more information on mailing lists in Mailman including creating and configuring mailing lists , you can see the Mailman List Administration Manual
Let’s create a new list in Mailman now
Start with the URL : http://mailmain.postbox.services/cgi-bin/mailman/create (prepare your URL using the domain you have used)
- Please fill out the form as described in the screen instructions, and in the “List creator’s password” field, type the admin password you created earlier.
- Click on the “Create List” button.
- Check your email for a message from Mailman informing you that your new mailing list was created.
- Now visit the list’s administration page, either by following the link on the confirmation web page or clicking on the link from the email Mailman just sent you. Typically the url will be something like http://mailmain.postbox.services/cgi-bin/mailman/admin/.
- Click on list name.
- I have created a list named postbox1, Click on the List name and put the password which you have given during the list creation .
- Type in the list’s password and click on Let me in..
After login you will see the new window like this.
With these options you can add the list members and manage the List.
Add a subscriber to the newly created list
Click Membership Management
- Click on the Membership List :
- Click on Mass Subscription :
Enter one address per line below…
Click the save changes button. Please check if emails saved, click again on Membership List Option :
How to remove a subscriber from the list
Click On Mass Removal from Membership Management Panel :
You can import the list file as well as put the single email address.
Click the Submit Your Changes
And again check with the Membership List option and you will see the emails have been removed.
Here is some general information for list :
Now for the pre-defined templates we can change the pages of lists .
Click on Edit the public HTML pages and text files
Select the page which you want to edit
For Example : click on General List information page
Now we change the page contents.
How to send Email to all subscribers:
We can post a message to a subscribed mailing list by sending an email message to listname@domainname ([email protected]), where listname is the name of the list. You will receive an email message confirming that your message has been posted to the list. If there is a problem with the post, you will receive notification that the message is being held and you will be contacted by the list moderator. If you need help using a mailing list, please send a message to [email protected].
Example:
List name : postbox1
Email address : [email protected]
Now your email will go to all subscribers following the list settings.
This video shows other features and options about mailman lists


